Enhancer: AI upscaling & refinement for images and videos
The Enhancer tool in Krea is designed to improve image resolution, clarity, and detail in your images and videos, whether they’re existing assets or AI creations you’ve previously generated with Krea. Perhaps you have a low-res archive image you need to blow up for print, a source photograph that’s blurry or underexposed, or a detail you need to make crisp. That’s what the Enhancer is for - crafting a sharper, crisper version of your image, by using AI to intelligently fill in the details.Use the Edit tool for making major changes to the style or appearance of the image.
Enhancer uses AI to creatively invent what a sharper, higher-res version of the scene might have been like – but it can’t magically produce an image of what really happened.
For example, you can’t use Enhancer to reveal what the text on a blurry sign ‘really’ said. Enhancer is not suitable for journalistic or investigative purposes; this is a creative tool, not CSI!
For example, you can’t use Enhancer to reveal what the text on a blurry sign ‘really’ said. Enhancer is not suitable for journalistic or investigative purposes; this is a creative tool, not CSI!
Enhancer can help if you have…
- Blown-out or lost photographic details due to over- or under-exposure
- Loss of detail through motion blur / slow shutter speed
- A small part of an image that you want to zoom in on without pixellation
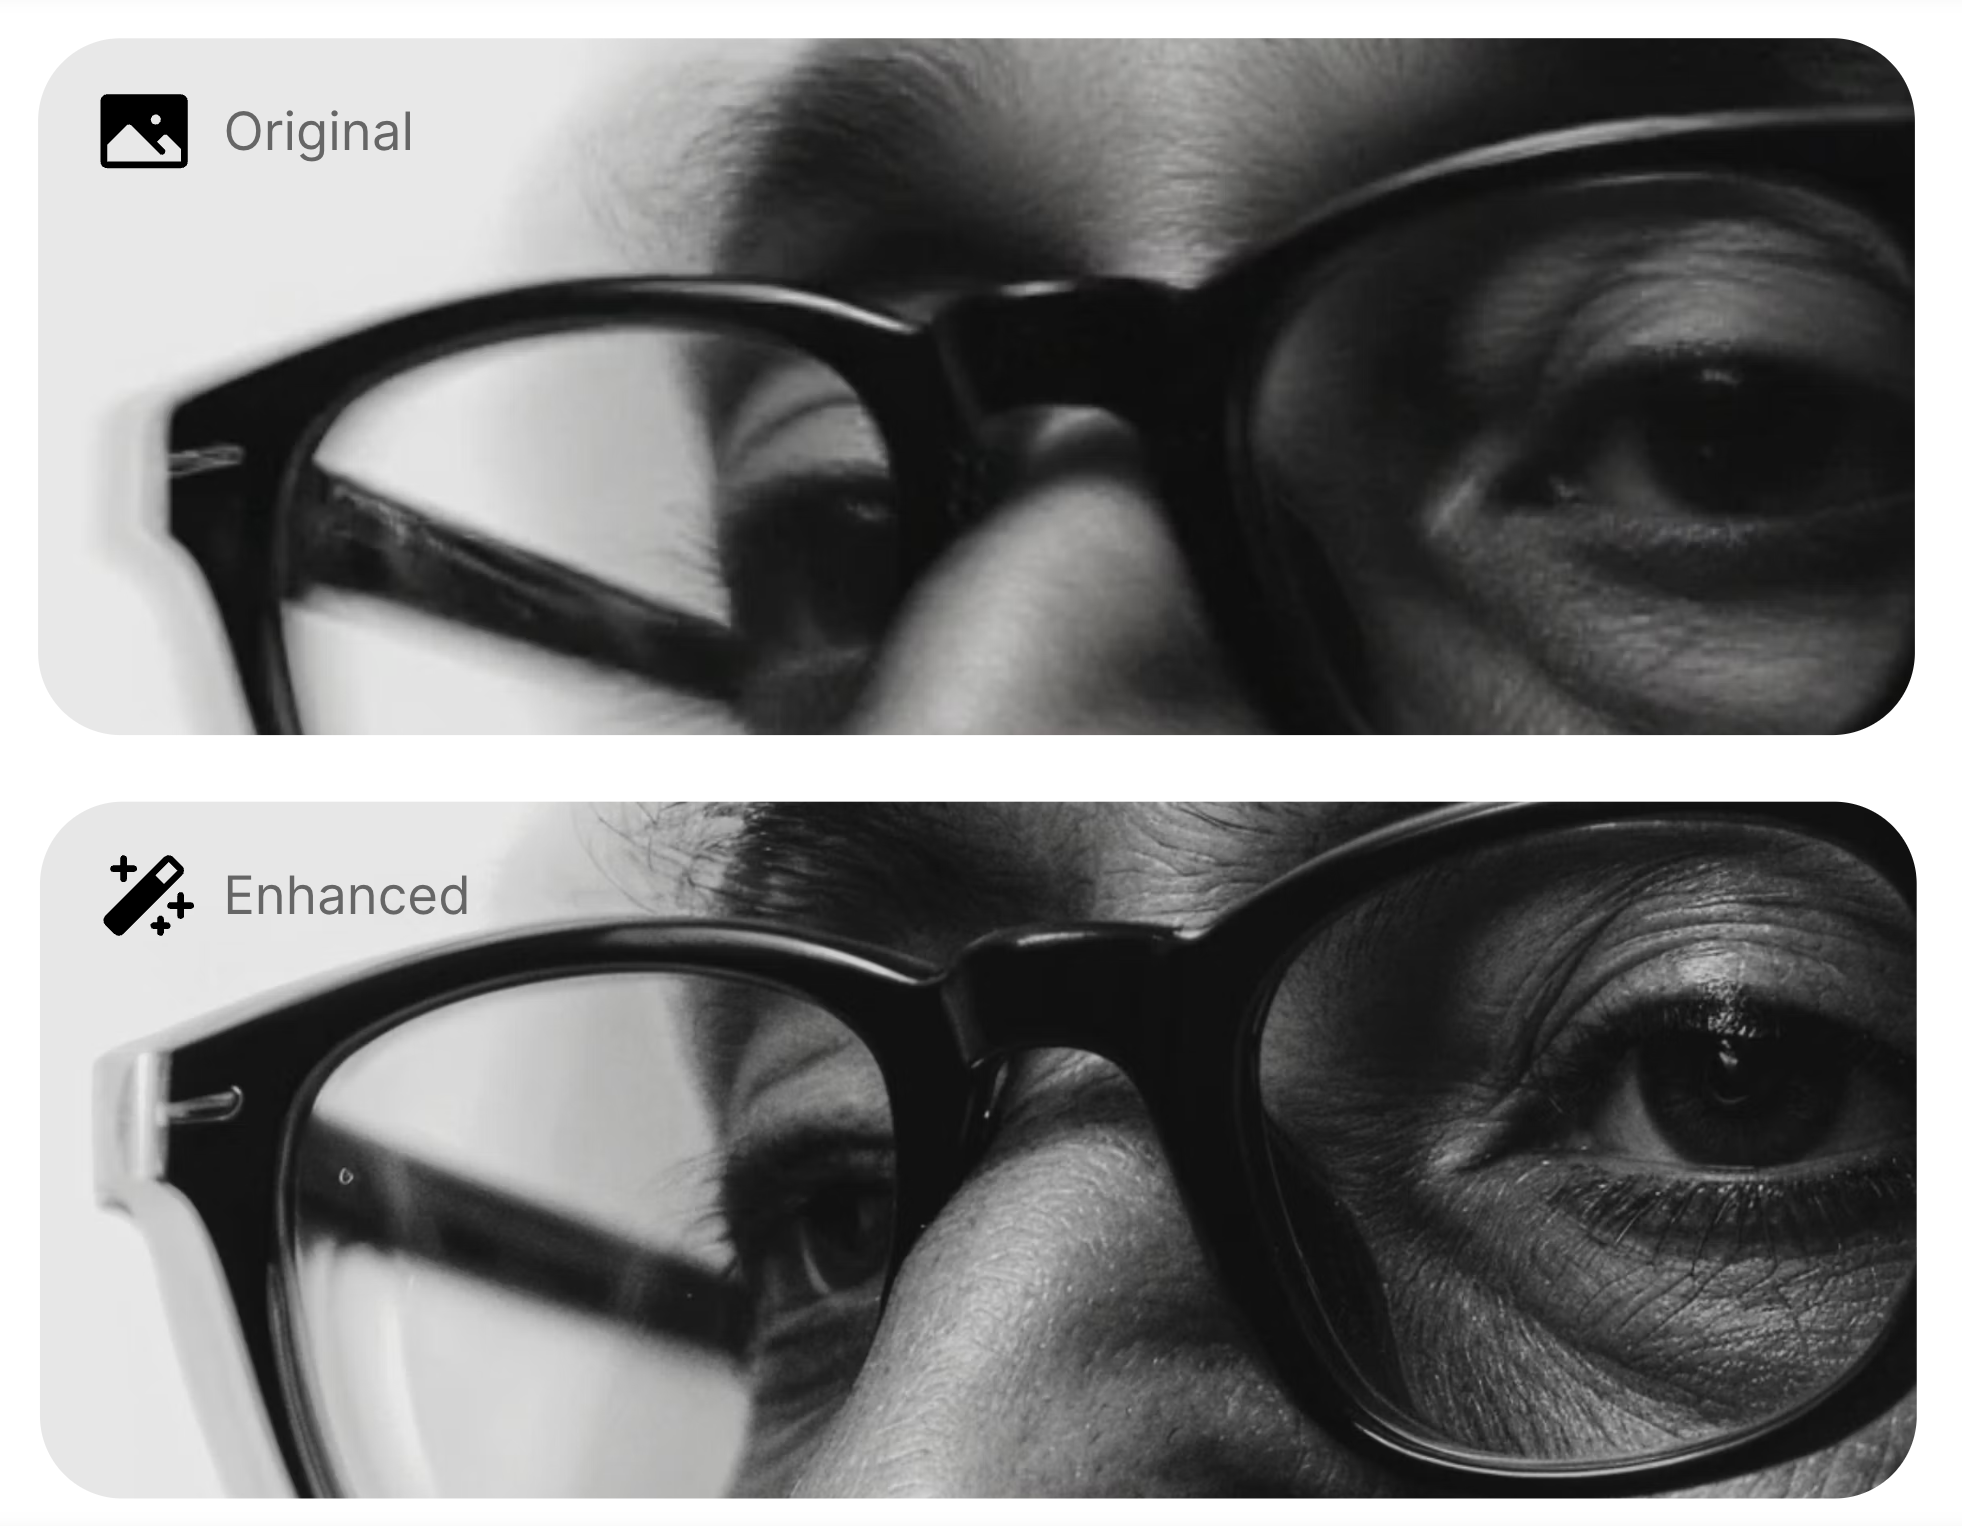
- Out of focus elements
- Low-resolution or overly-compressed original images
- An AI image from a low-resolution to a more demanding use (e.g: upscaling a 1024px output from Nano Banana into a 4k image suitable for a large print)
- A low-quality digital render you want to enhance
Enhancing and upscaling images with Krea
It’s easy to enhance images with Krea. Let’s take a look.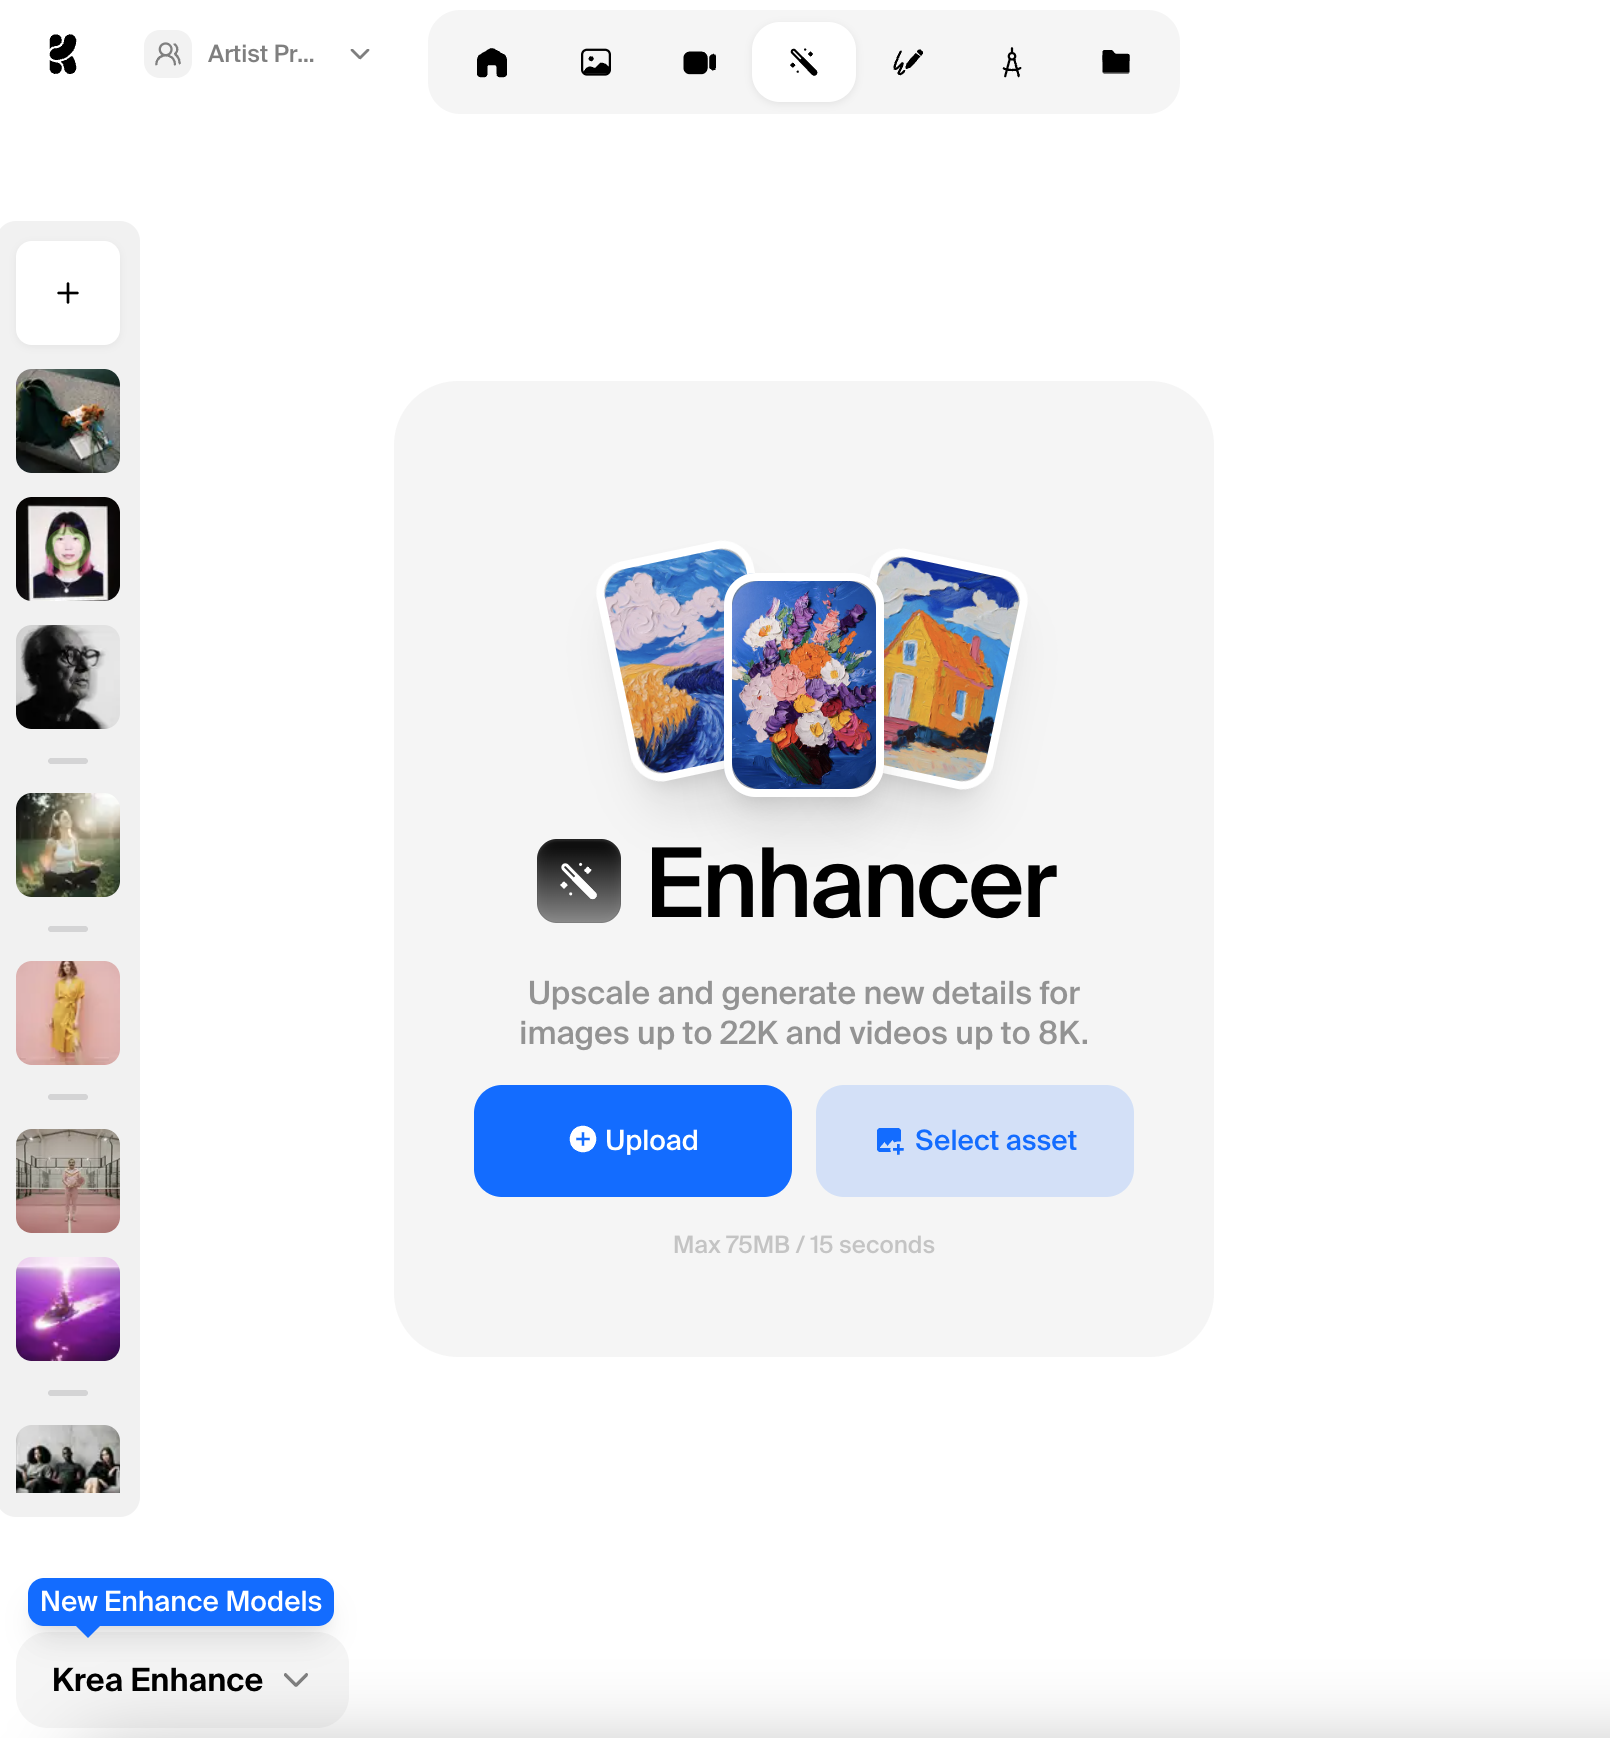
1. Upload or select an Image
- Upload the image you want to enhance, or select an image from your previous Krea image generations.
- The left sidebar provides quick access to previous enhancement jobs.
2. Choose your enhancement model
- In the bottom-left of the page, you can switch between different Enhancement models. Choices include our own Krea Enhance, the no-frills Topaz V1 for neutral upscaling work, and the Topaz upscaling models.
- Each model comes with a different group of settings, so it makes sense to choose your model before you adjust the settings!
3. Choose an upscale factor
- 1x, 2x, 4x, 8x scaling options are available for generating high-resolition outputs.
- Use 1x if your original image has satisfactory resolution but simply needs to be clearer, or choose a larger multiplier if you want to upscale your output at the same time.
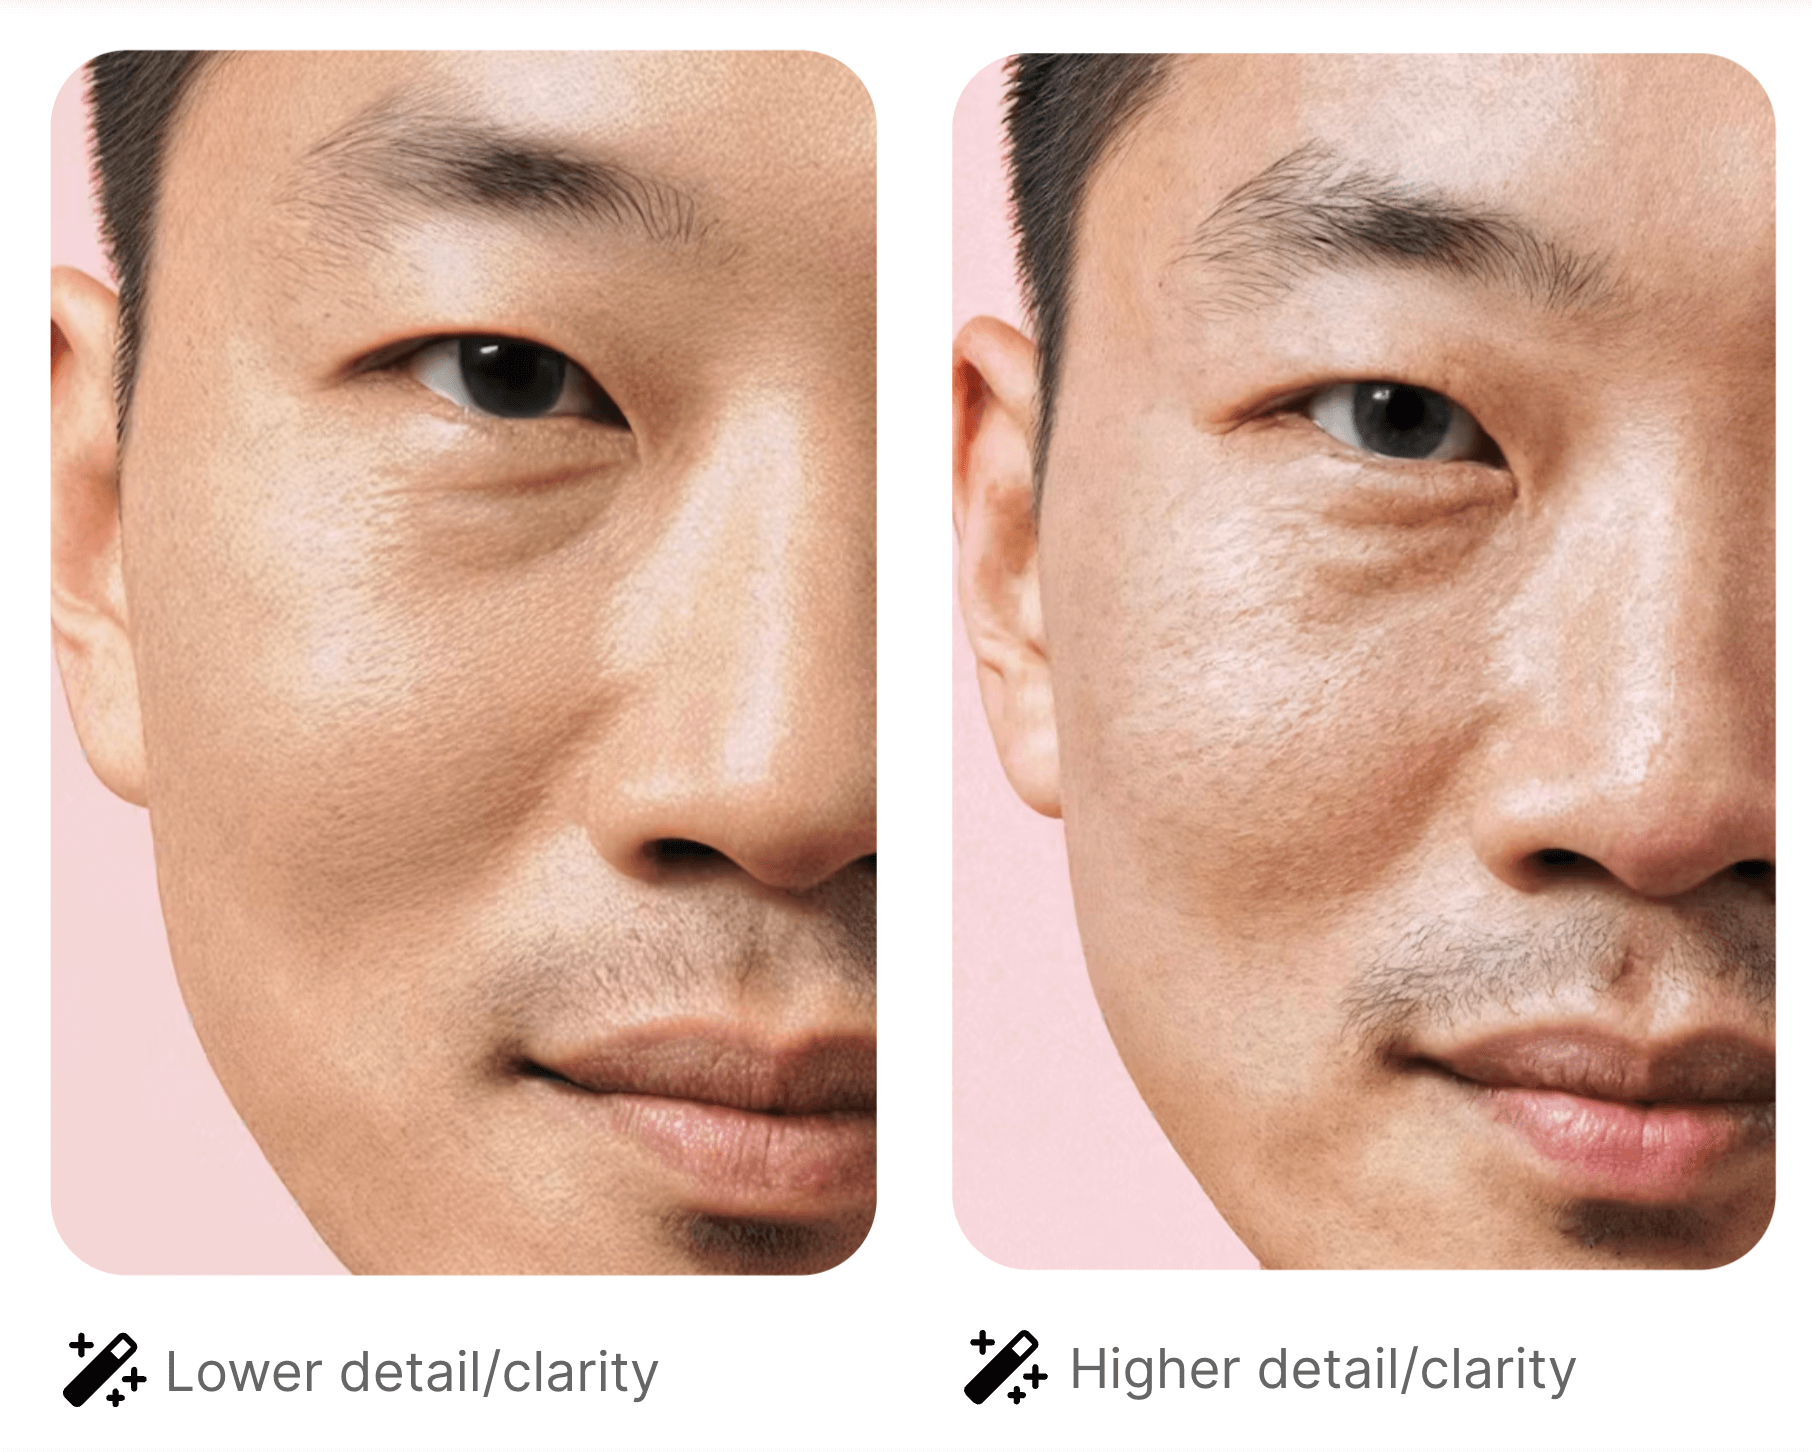
- Higher upscale values retain finer details, but may introduce subtle AI modifications to textures and edges.
4. Adjust the settings
Different models offer different settings, although they can be similar to each other. They are:| Setting | Model | Description |
|---|---|---|
| Strength | Krea Enhance | Higher values increase sharpness with more ‘invented’ detail from the AI. Decrease to keep things simple. |
| Resemblance | Krea Enhance | Higher values force the AI to hue closely to the original image. Lower values give more room for variations. |
| Clarity | Krea Enhance | Higher values push the AI in the direction of the supplied prompt. |
| Sharpness | Krea Enhance, Upscale V1 | Higher values generate sharper outputs with fewer blurry elements, more an image setting than an AI one. |
| Match color | Krea Enhance | Turn ‘on’ to precisely match the color pallette of the supplied image. |
| Denoise | Topaz, all models | Increase to remove film grain, sensor noise, and other speckly artifacts. |
| Model | Topaz | Choose from the individual Topaz model you want to use: Standard Low resolution High fidelity CGI |
| Face detection | Topaz, all models | Turn this on to tell the AI the image has a face you want to restore specifically that ought to look ‘face-like.’ Unlocks the other subsettings. |
| Face creativity | Topaz, all models | Increases the amount of ‘invention’ the AI brings to rescuing a face that’s blurry or poorly-defined. |
| Face strength | Topaz, all models | Increases the strength of the face generation effect. |
| Creativity | Topaz Generative | Similar to ‘strength’ above, increasing the generative effect and inventing additional detail. |
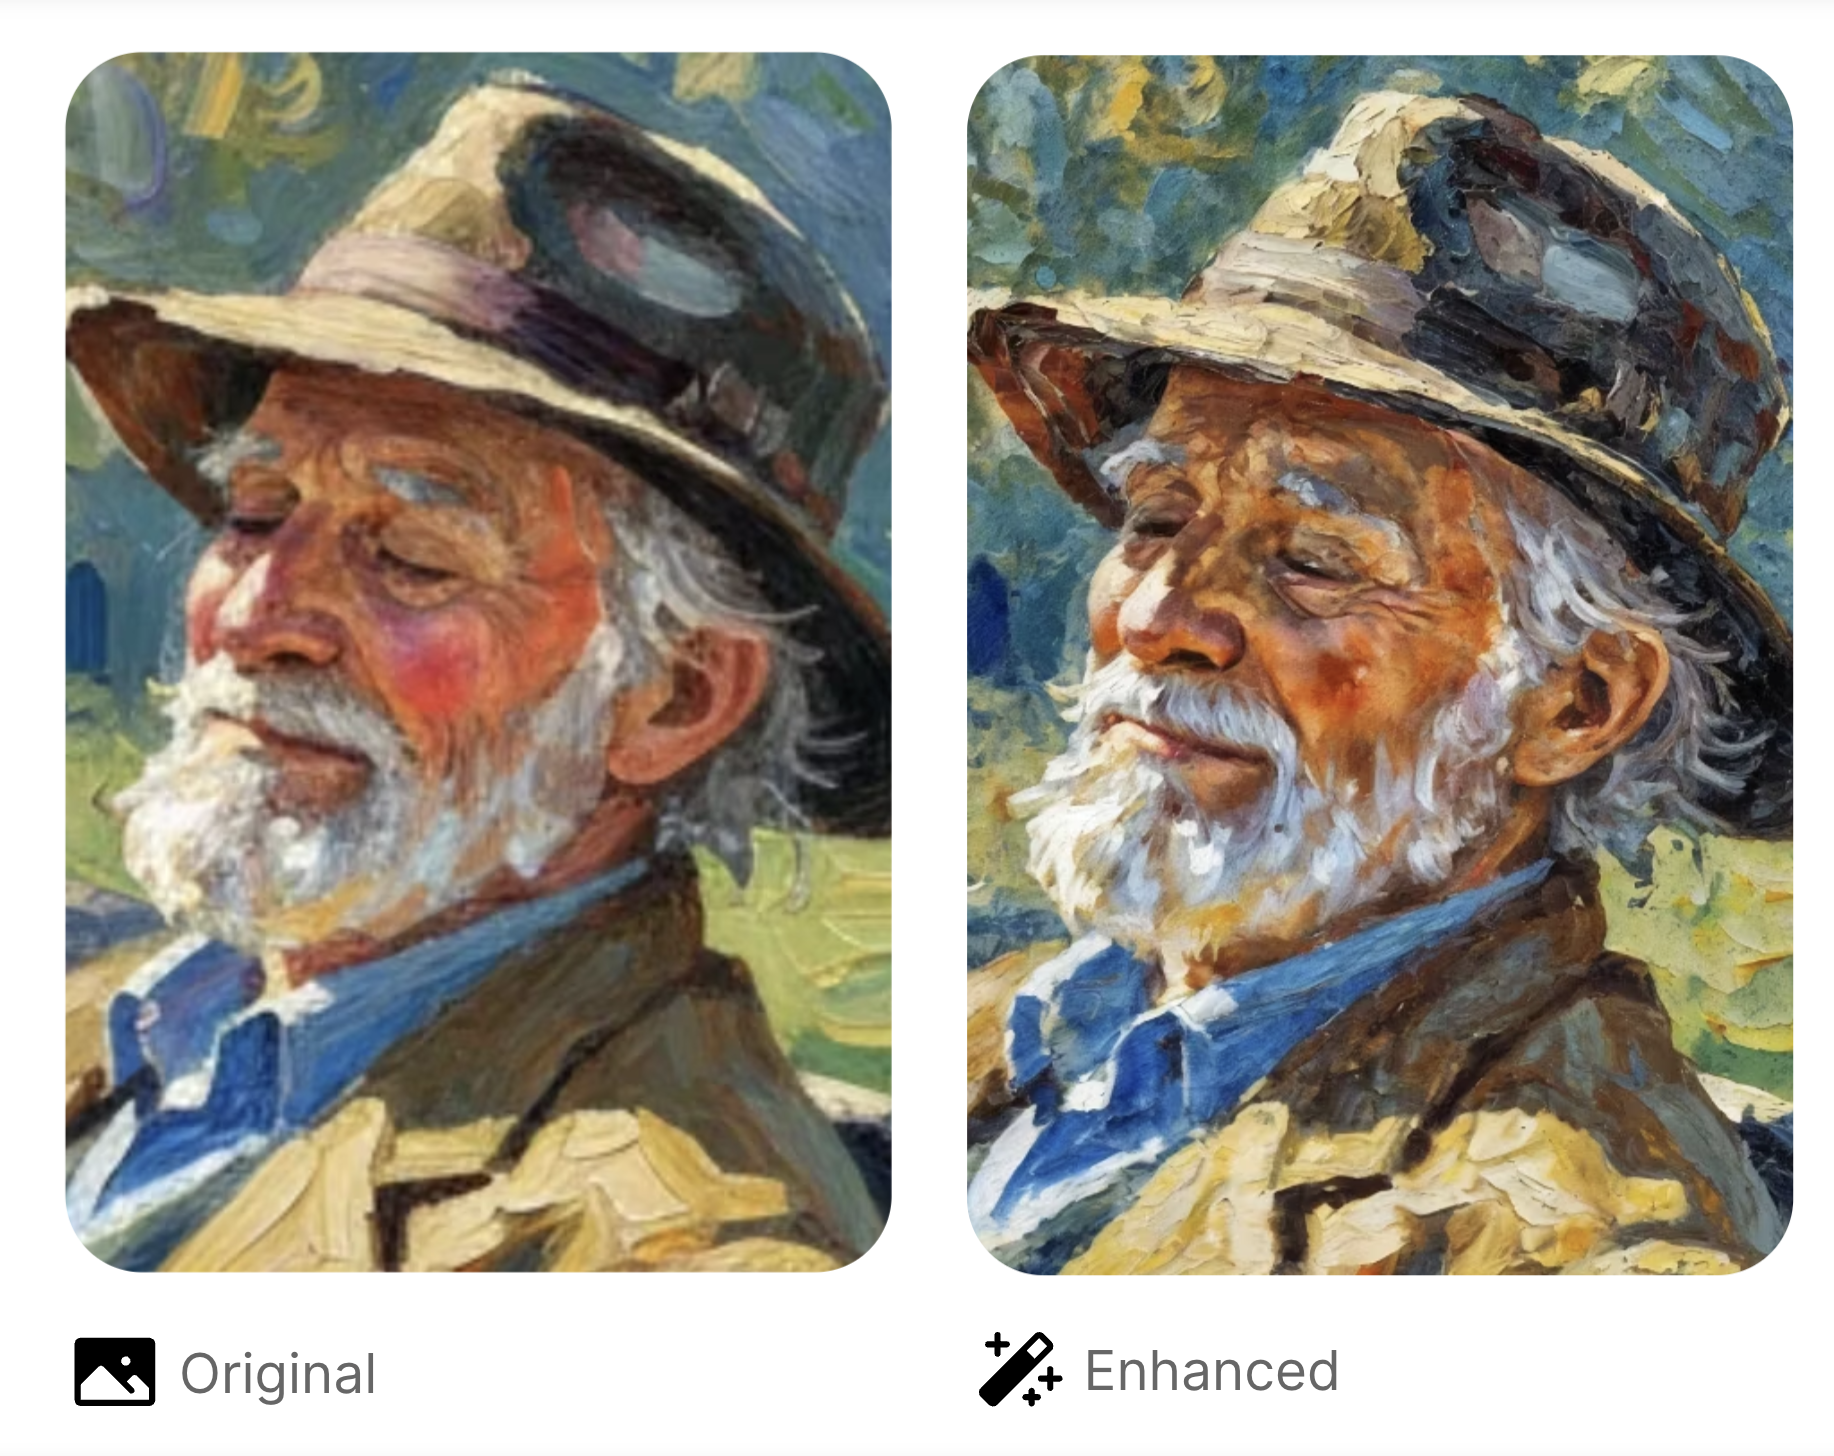
| Texture | Topaz Generative | Increases the level of ‘fine detail’, for example a lower texture will upscale to make blades of grass appear larger, while a higher texture will generate additional, smaller blades of grass. Likewise, an upscaled artwork with high-texture may provide additional brushstrokes and paint detailing, whereas a low texture alternative will only upscale the strokes that are already visible. |

5. Add a prompt (optional)
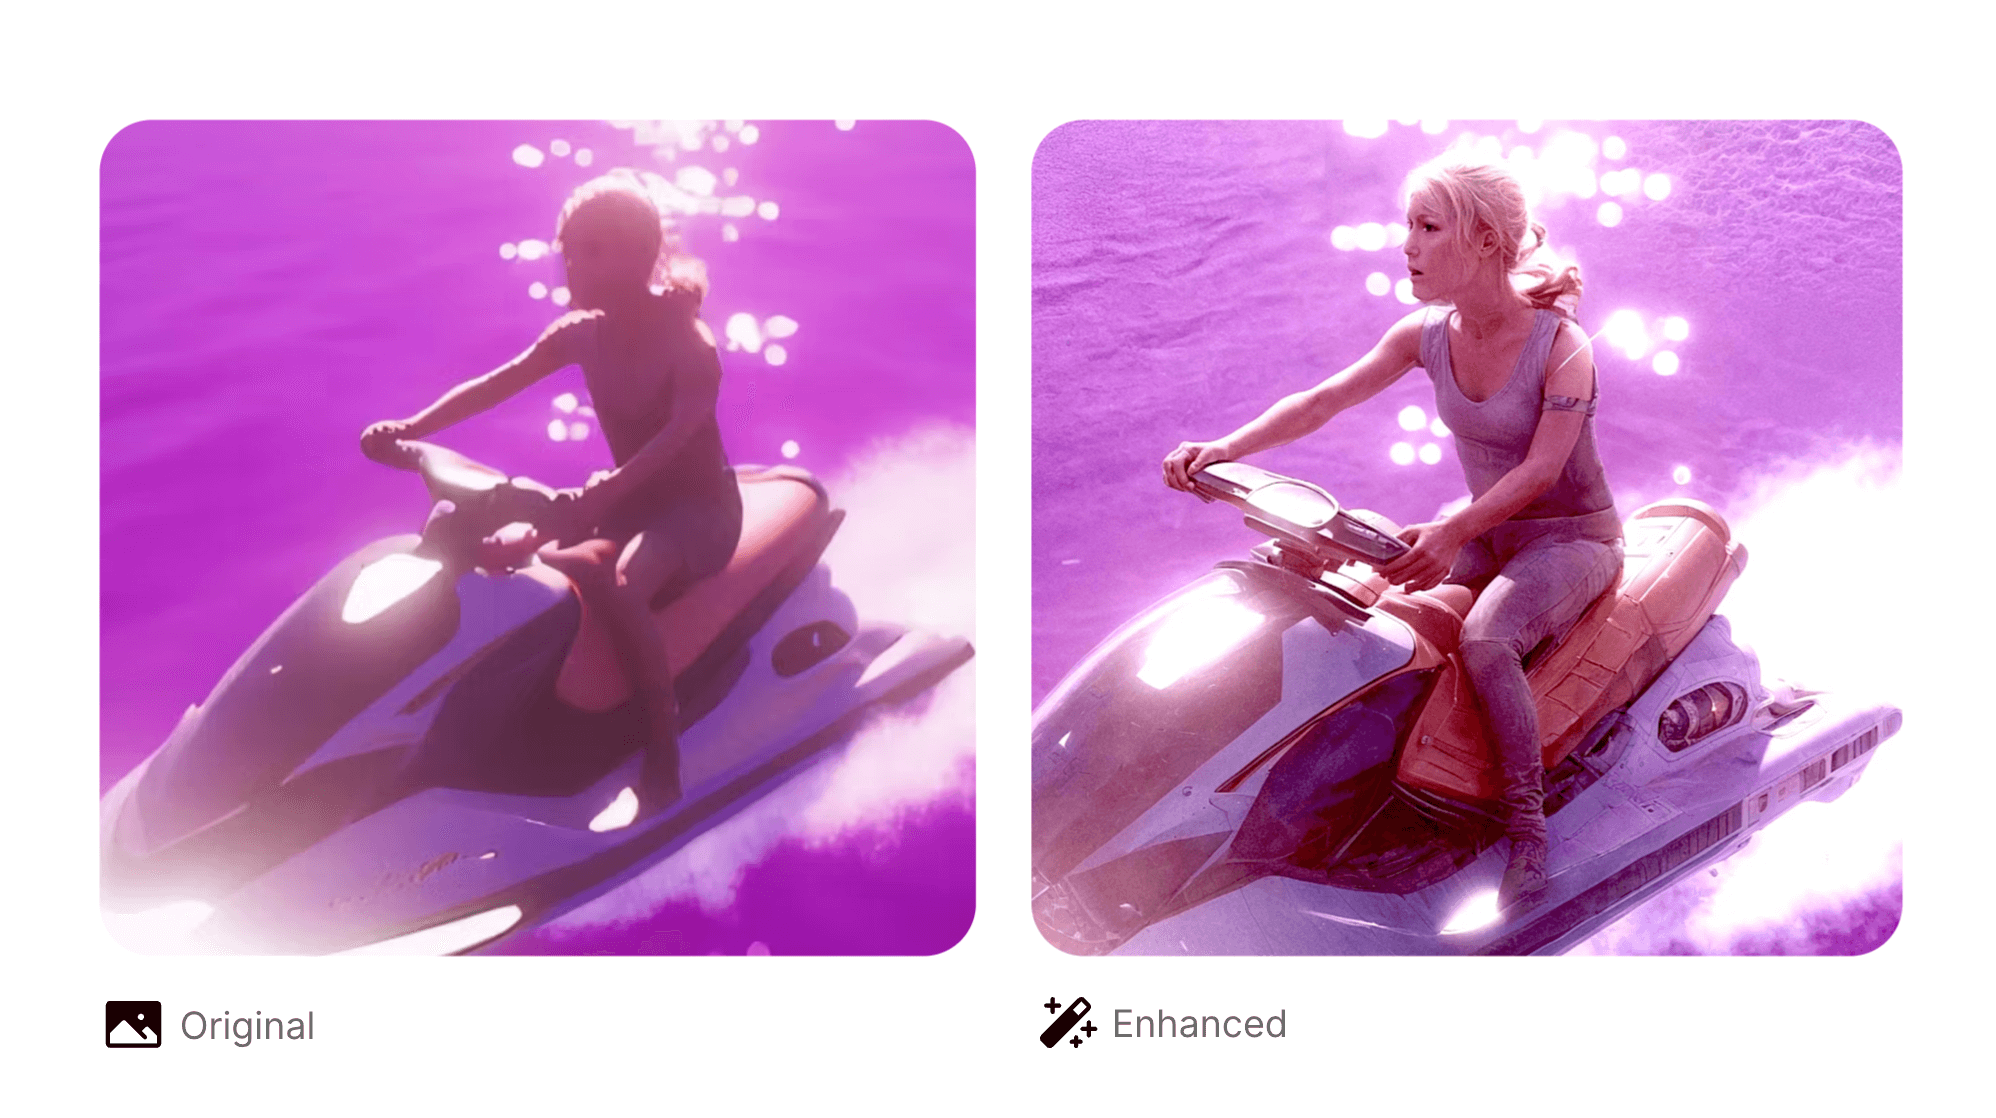
Your prompt should describe the final image you want to see, and will help the AI understand how to fill in the missing data. For example, if you’re enhancing an image of a silhouetted-figure where the details are unclear, your description might help make it clearer what the person is wearing, what they look like, and so on.Don’t prompt for the changes you want made (as in “change the scene from night to day”), simply describe for the final image you want to see (“a bright daylight scene.”)
6. Scene Transfer Mode (currently only available on Krea Legacy Enhancer)
- Activating Scene Transfer allows you to modify the lighting, environment, and mood of an image.
- Upload a reference scene or enter a text-based scene prompt to guide the transformation.
- Example: Applying “cinematic blue lighting” can give an image a high-contrast, film-inspired look.
7. Enhance!
Hit the Enhance button to start the enhancement process, which takes between 10 and 120 seconds depending on the model used and level of upscaling required.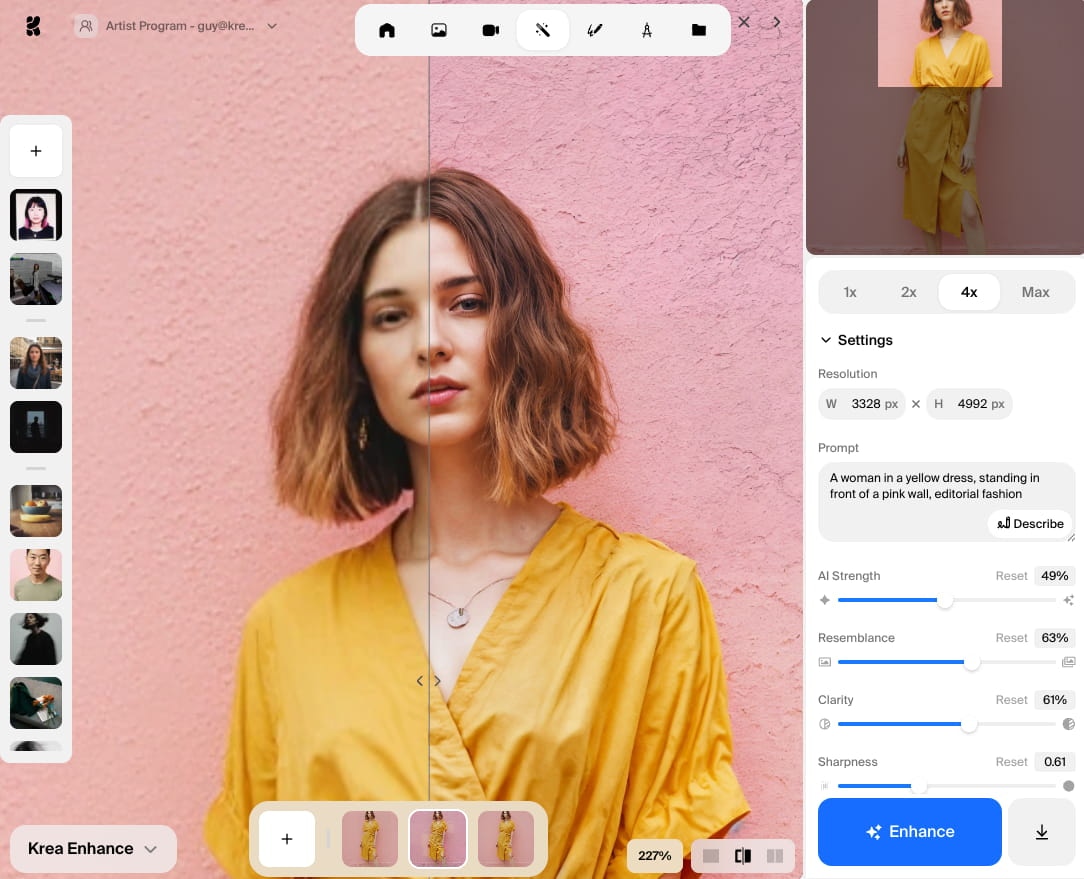
- To inspect fine details, zoom in by scrolling. Drag the comparison slider bar left and right to see before and after versions, or use the view controller in the bottom-right to see the two images side by side instead.
- Your final image is retrievable as a thumbnail at the bottom of the screen. You can also find all your upscale experiments in Assets.
- You can create multiple enhancements of the same image, using different settings or different models. These all appear as seperate thumbnails, so you can switch between results.
- You can run multiple enhancements simultaneously, to save time.
Enhancement Presets (Krea Legacy)
In the Krea Legacy model, the enhancement presets adjust the different settings sliders to help you achieve particular effects.- Default: Standard AI refinement, with balanced sharpness and clarity.
- Flat Sharp: Enhances texture and sharpness, without altering color grading.
- Strong: Increases contrast and detail intensity.
- Reinterpretation: Allows AI to creatively reimagine the composition while enhancing resolution.
- Oil Painting: Softens edges and adjusts textures for a painterly effect.
- Digital Art: Enhances the image with a stylized, high-fidelity digital look.
Scene transfer (Krea Legacy)
In Krea Legacy, the scene transfer function allows you to guide the AI behaviour by providing an image similar to your desired outcome.Best practices
- For high-resolution projects (e.g., prints or detailed concept art), upscale in steps (2x → 4x) rather than jumping to 8x immediately.
- For stylistic consistency, use Scene Transfer (on Krea Legacy) or preset filters instead of manual tweaking.
- For seamless blending, integrate enhanced images back into Edit Mode to refine composition edges or apply targeted modifications.
- If an image has already been enhanced at 2x, applying another 1x enhancement will work on the 2x version, not the original, which may result in compounding AI interpretations.
- Output image size increases as the square of width. The scale multiplier refers to the increase of the image width/height – for instance, a 2x upscale will expand an image from 1024x1024 to 2048x2048. This means that:
- a 2x upscale results in an image 4x larger
- a 4x upscale results in an image 16x larger
- an 8x upscale will result in an image that’s 64x larger
Image enchancement and upscaling models
| Model | Description | Speed | Maximum resolution | Compute credits |
|---|---|---|---|---|
| Krea Enhance | Our powerful generative upscaler, great for adding additional detail and improving lower-resolution AI images. | 30s | 8k | - |
| Upscale V1 | A simple, fast upscaler that preserves details exceptionally well. | 5s 🏆 | 8k | - |
| Bloom | Creatively upscales images up to 8k, adding stunning detail that’s faithful to your original image. | 60s | 10k | - |
| Topaz | A powerful upscaler with advanced settings. | 10s | 22k 🏆 | - |
| Topaz Generative | A more creative, AI-forward version of the Topaz model. | 40s | 16k | - |
| Krea Legacy | Our original enhancement model, with scene transfer. | 30s | 4k | - |
Enhancing videos with Krea
Upscaling videos with Krea uses much the same interface. When you upload a video or choose a video from your Assets to enhance, you’ll see a different set of models and settings to choose from.Upscaling videos can use your compute budget quickly.
Video upscaling settings
These settings correspond to either the upscale (adjusting the resolution of the video) or other visual enhancements (such as reducing noise, improving focus, and so on.)| Setting | Options/Range | Description |
|---|---|---|
| Resolution | 4096x2160 (Original) | Output resolution for your video. Shows your original dimensions by default. Can be increaed up to 8k with some models. |
| Enhancement | Toggle (On/Off) | Master toggle to enable/disable AI enhancement processing. |
| Video Type | Progressive, Interlaced, Progressive & Interlaced | Define the video format your source footage is in. Most modern digital video formats are progressive. |
| Model | Proteus, Iris, Artemis, Nyx, Gaia, Apollo | When using the Topaz model, choose the AI sub-model most appropriate for your needs (see below. |
| Focus Fix | None, Normal, Strong | Attempts to fix out of focus elements int he source footage. |
| Parameters | Auto, Manual | Controls enhancement settings. “Auto” recommended for most users. Manual options include: Revert compression: adjusts the level of artifact reduction Recover details: controls how much fine detail the model should try to recover Preblur: adjusts anti-aliasing strength Sharpen: increases sharpness of output Reduce noise: tries to filter out sensor noise and grain Reduce halo: tries to minimize bright outlines as a result of excessive sharpening |
| Creativity | Low, High | Controls AI’s creative interpretation. Low = conservative, High = aggressive enhancement. |
Frame Interpolation Settings
These settings control the creation of ‘additional frames’ to change the frame rate or video length.| Setting | Options/Range | Description |
|---|---|---|
| Frame Interpolation | Toggle (On/Off) | Generates new frames between existing ones to increase frame rate or create slow-motion. |
| Frame Rate | 30 fps, 60 fps, 90 fps, 120 fps | Target frame rate for output video. Higher = smoother motion. |
| Model | Apollo | Primary model for frame interpolation and slow-motion effects. |
| Slow Motion | 1x to 8x+ (slider) | Multiplier for slow-motion effect (e.g., 3x = three times slower). |
| Fix Duplicate Frames | Toggle (On/Off) | Detects and removes duplicate frames, replacing them with interpolated frames. |
| Sensitivity | 0-100% | Controls interpolation sensitivity to motion. Default: 9%. Lower = less aggressive. |
Grain Settings
| Setting | Options/Range | Description |
|---|---|---|
| Grain | Toggle (On/Off) | Enables grain effect for natural or cinematic look. |
| Strength | 0.0 - 0.1 | Intensity of grain effect. Default: 0.02 (very subtle). |
| Size | 0.1 - 5.0 | Size of grain particles. Default: 1.0. Smaller = finer grain. |
Krea Video settings
| Setting | Options/Range | Description |
|---|---|---|
| Upscaling level | 1x, Max, others | Use 1x to keep the output video the same size, or Max to increase it to 4096 x 2160 (4k) resolution. |
| Frame Rate | 30 fps, 60 fps, 120 fps | Desired frame rate for output video. |
| Prompt | Text field | Describe your video content to help AI understand and process footage better. |
| AI Strength | 0-100% | How strongly the AI adjusts the source video to match the given rompt. Default: 39%. Lower = conservative. |
| Resemblance | 0-100% | How closely output resembles the original video’s stronge. Default: 48%. Higher = closer to original. |
| Preset | Cinematic, render, animation. | Pre-configured settings optimized for different video types. |
| Looped | Toggle (On/Off) | Turn this on if your output video should be ‘looping’ (i.e: the first and last frames are identical.) |
Topaz AI sub-models, compared
When using the Topaz video upscaler, you’ll have the option to choose from a set of sub-models, each with slightly different capabilities. Here’s an at-a-glance guide to the best model for your use case – per Google’s AI overview.| Model | Best For | Strengths | Weaknesses |
|---|---|---|---|
| Proteus | General improvements, high-quality upscaling | Versatile default option, manual control over compression/detail/sharpening | Can be fuzzy with less defined textures compared to specialized models |
| Iris | Face enhancement | Better clarity and sharper details on faces than Proteus, works well with low to medium quality video | Can show facial warping or distortion on close-up zooms |
| Artemis | Denoising, high-quality videos | Good for denoising with more sharpness than Nyx | Less smoothing than Nyx, can leave more noise |
| Nyx | Denoising, high-quality videos | Excellent at removing noise and grain, especially from older footage | Aggressive smoothing can reduce image detail and realism |
| Gaia | Upscaling high-quality sources, animation | Effective for upscaling high-resolution input (1080p or higher) and extracting detail from animation | May not be as effective on lower-quality inputs as other models |
| Apollo | Slow motion | Creates smooth slow-motion effects (4x or 8x) | Specifically for slow-motion and frame interpolation |