




Create
Edit & enhance
Intro to Krea
Where to start: a walkthrough of the platform
Open KreaWelcome
Welcome to Krea. One workspace for every image and video.
Krea brings the best image and video models, including our own, into one place for your team. This guide walks through each tool in the order most teams start with, so you know what you will see when you log in and where to begin.
01 Image
Use it to
Make images from a prompt or a reference.
02 Edit
Use it to
Change one part of an image and keep the rest.
03 Realtime
Use it to
Sketch, and see it rendered as you draw.
04 Video
Use it to
Make, edit, extend and swap video clips.
05 Nodes
Use it to
Chain steps into a workflow you can reuse.
Under the hood
Krea 2 and Krea 3, the image models we build ourselves.
Where it all lives
Krea Drive keeps every file you and your team make.
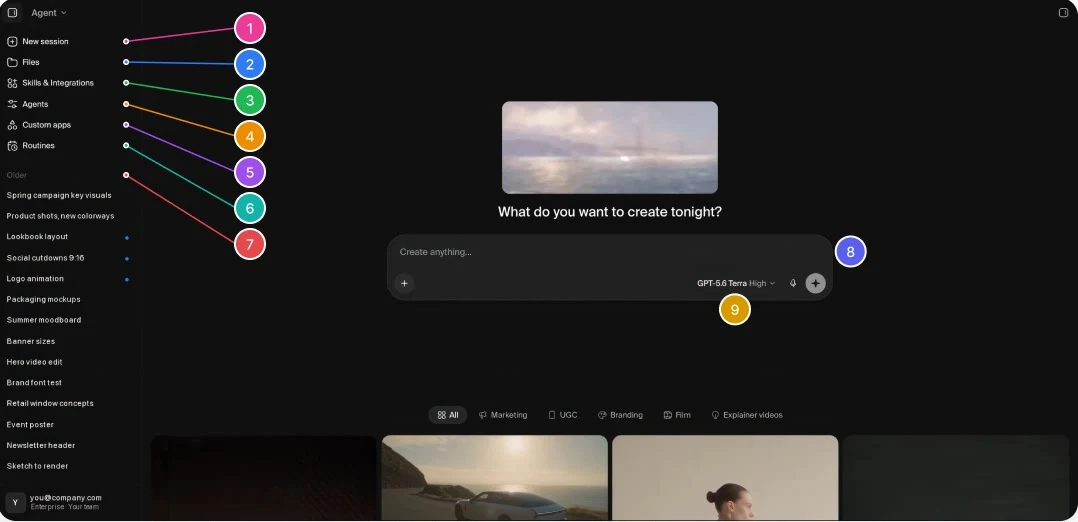
The interface
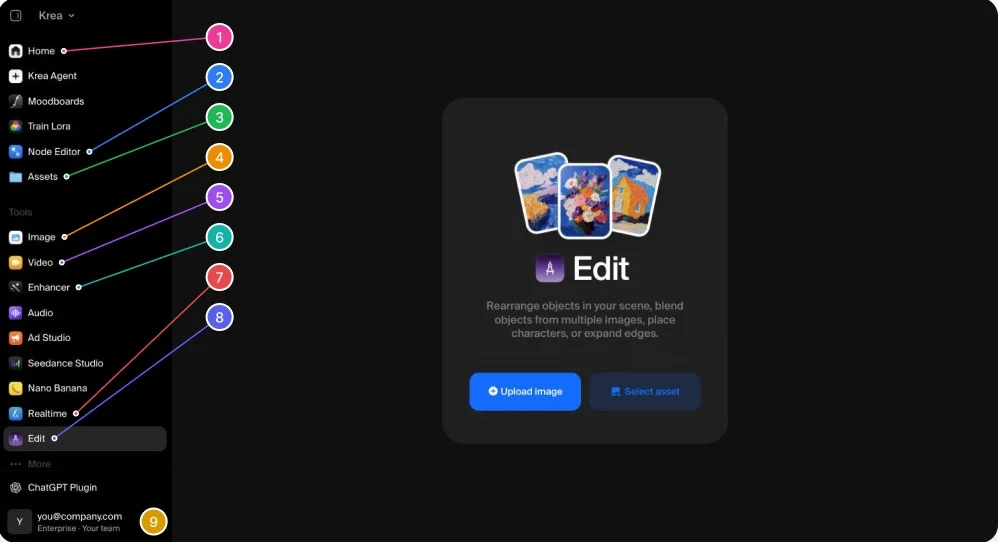
Find your way around. Every tool lives in the sidebar.
-
Home
Launches, news and templates to start from.
-
Node Editor
Chain tools into workflows you can rerun.
-
Assets (Krea Drive)
Everything you and your team have made.
-
Image
Generate images from a prompt or references.
-
Video
Generate and edit video with the top models.
-
Enhancer
Upscale and sharpen images and video.
-
Realtime
Draw or use your camera, and see it render live.
-
Edit
Change, move or add things in an image.
-
Your account
Your workspace, team and plan.
The tools
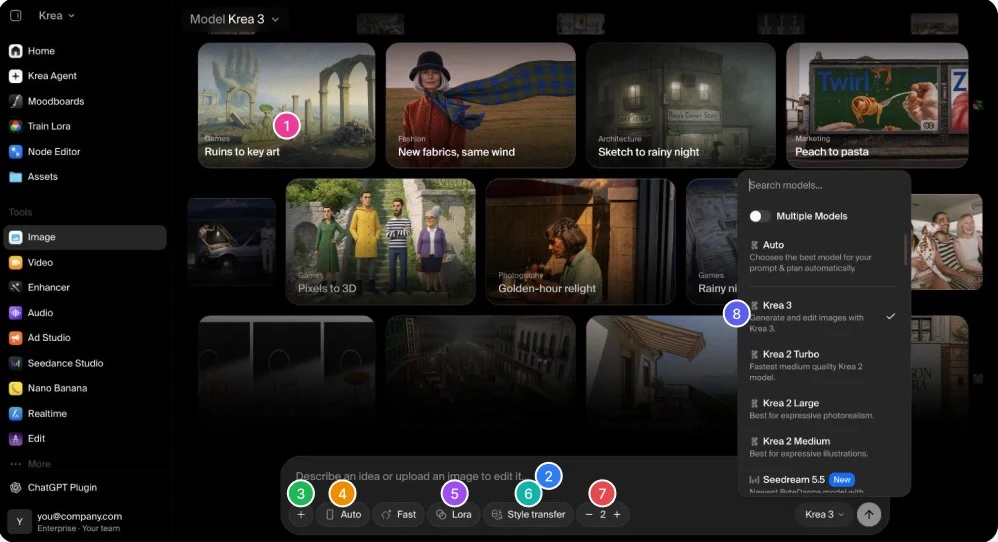
Image Describe it, pick a model, get options.
-
Start from an example
Open any card to see the prompt behind it.
-
Prompt box
Describe what you want, or drop in an image.
-
Add images
Use references: your product, a face, a style.
-
Aspect ratio
Square, portrait, landscape, or Auto.
-
LoRA
Apply a style or character your team trained.
-
Style transfer
Borrow the look of another image.
-
Number of images
How many options you get per run.
-
Model
Krea 3 by default. Also Krea 2, Nano Banana, Seedream and more.
The tools
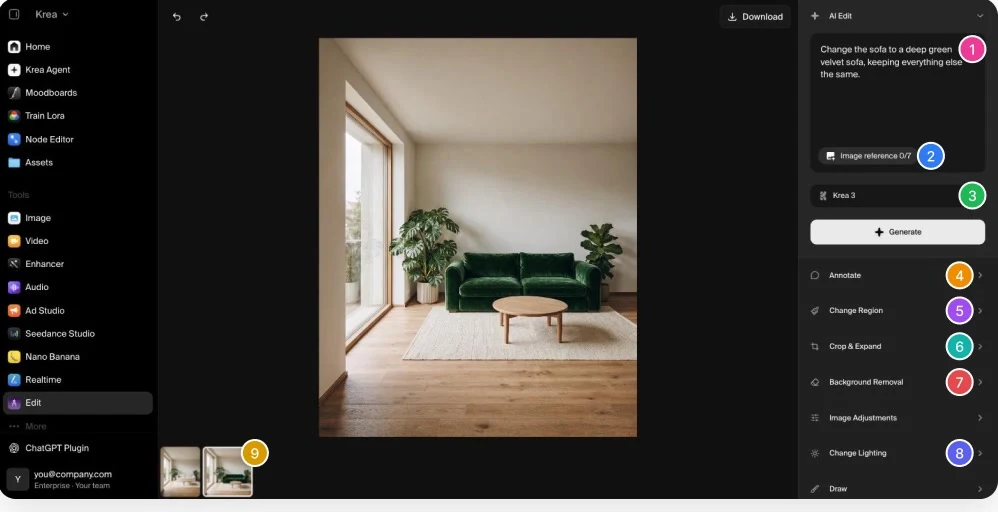
Edit Change one thing, keep everything else.
-
AI Edit
Say what changes, and what stays the same.
-
Image reference
Add up to 7 images: a product, a fabric, a face.
-
Model
Krea 3 by default, under 8 seconds per edit.
-
Annotate
Write notes directly on the image.
-
Change region
Brush over an area and change only that.
-
Crop & expand
Reframe or extend to a new format.
-
Background removal
Cut out the subject in one click.
-
Change lighting
Relight the same scene.
-
History
Every version stays, so you can go back.
The tools
Edit, in practice One prompt, one change.
Before
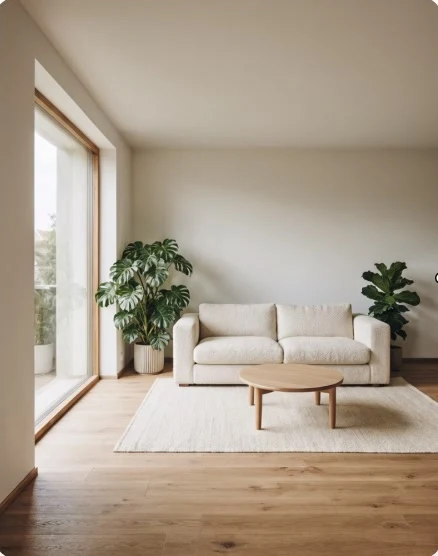
You ask
Change the sofa to a deep green velvet sofa, keeping everything else the same.
Tip: name what should stay the same. Use “only” when one thing should change.
After
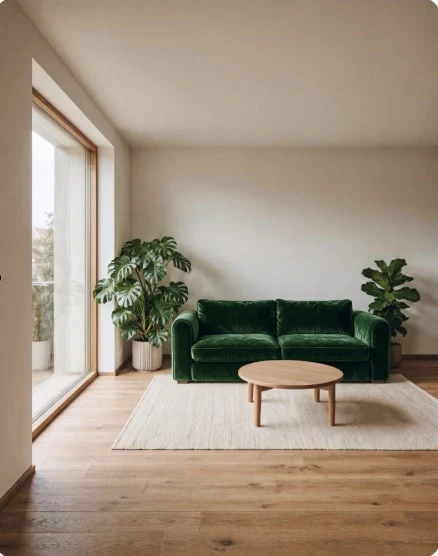
The sofa changes. The plants, rug, floor and light stay as they were.
The tools
Realtime Draw, and watch it render as you go.
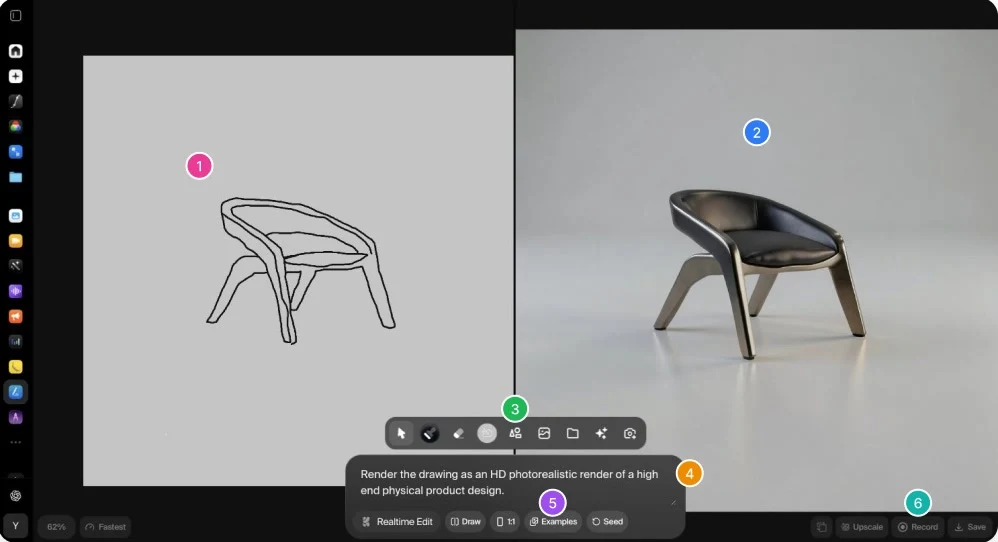
-
Your canvas
Draw, paste an image, or turn on your camera.
-
Live result
Updates while you draw, almost instantly.
-
Tools
Brush, eraser, shapes, images and camera.
-
Prompt
Say what the drawing should become.
-
Examples
Start from a ready-made setup.
-
Upscale, record, save
Keep the frame you like at full quality.
The tools
Video Pick a model, describe the shot.
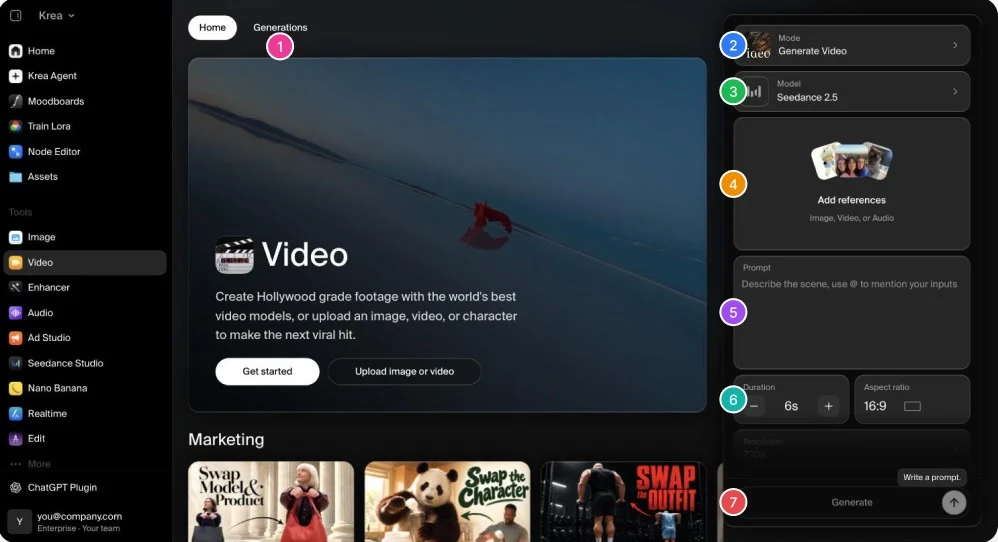
-
Generations
Every video you have made, in one place.
-
Mode
Generate, edit, extend, swap, lip sync and more.
-
Model
Seedance, Kling, MiniMax, Wan and more.
-
References
Add images, video or audio to guide it.
-
Prompt
Describe the shot. Type @ to point at a reference.
-
Duration & format
Length, aspect ratio and resolution.
-
Generate
Your clip lands in Generations when it is ready.
The tools
Nodes Save a process and run it again.
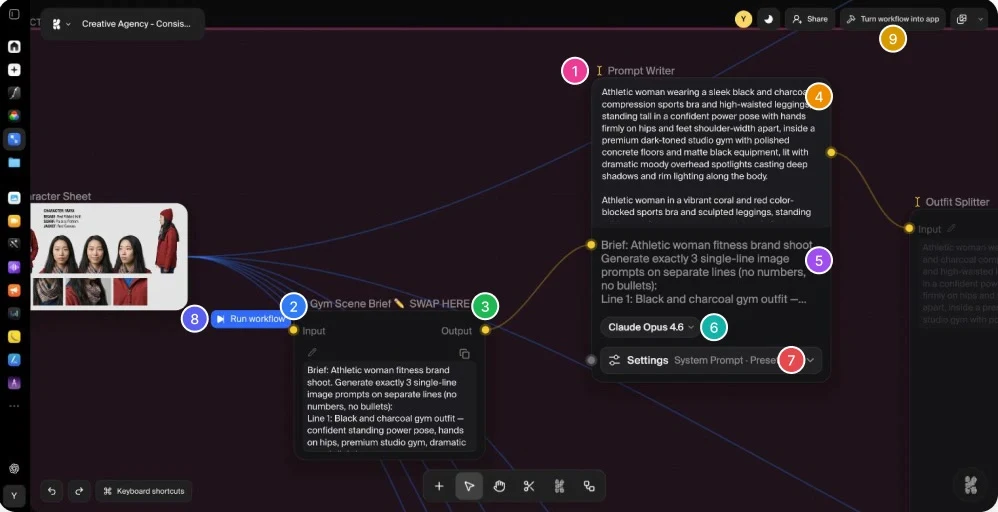
-
Node name
What the step does. Rename it for your team.
-
Input
Drag a line in from another node.
-
Output
Drag out to feed the next node.
-
Result
What the node made: here, the written prompts.
-
Instructions
What you tell this step to do.
-
Model
Pick the model that runs this step.
-
Settings
System prompt, presets and more.
-
Run workflow
Run the whole chain in one click.
-
Turn workflow into app
A simple form anyone can run.
The tools
Nodes, how it works Chain tools into one workflow.
Nodes is a canvas where every box is one step: a prompt, a model, an upscale, an edit. Connect them once, run the whole chain whenever you need it, and turn it into a simple app your team can use.
Text
Prompt
“Sneaker on a sunny terrace”
Generate Image
Krea 3
1 image, 2K
Enhance Image
Upscaler
2× sharper
Generate Video
Seedance
5 s, 16:9
Inputs left, outputs right.
Drag from any handle to see what can connect.
Colors mean types.
Text, image, video and audio each have their own color.
Make it an app.
Pick the fields people fill in; they press Generate.
The tools
Nodes, in practice One character, three outfits.
Input
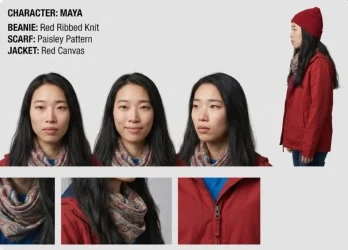
The workflow
-
Brief
Fitness shoot, three colorways
-
Krea 3
Makes the base shot of Maya
-
Splitter
Sends one color to each edit
-
Krea 3, regional edit
Changes only the outfit, nothing else
Output
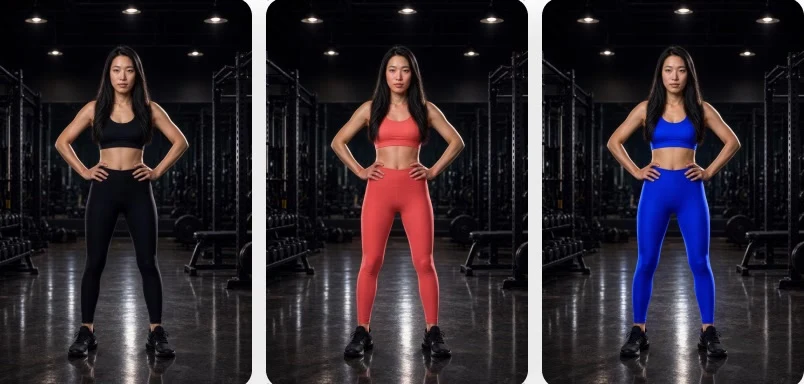
Same face, same pose, same light. Only the outfit color changes, so a whole colorway is ready in one run.
Our models
Krea 3 & Krea 2 Two Krea models, two jobs.
Krea 3
Precise and consistent
Our newest model, and the default. It makes and edits images from plain instructions at native 2K, most edits in under 8 seconds, with up to 6 references. Products, characters, logos and text stay exactly the same.
Use it for
Krea 2
Style and exploration
Our first foundation model, built for how an image looks. Steer it with style references, a moodboard, trained styles and Generative Sliders. Comes in Large, Medium and Turbo.
Use it for
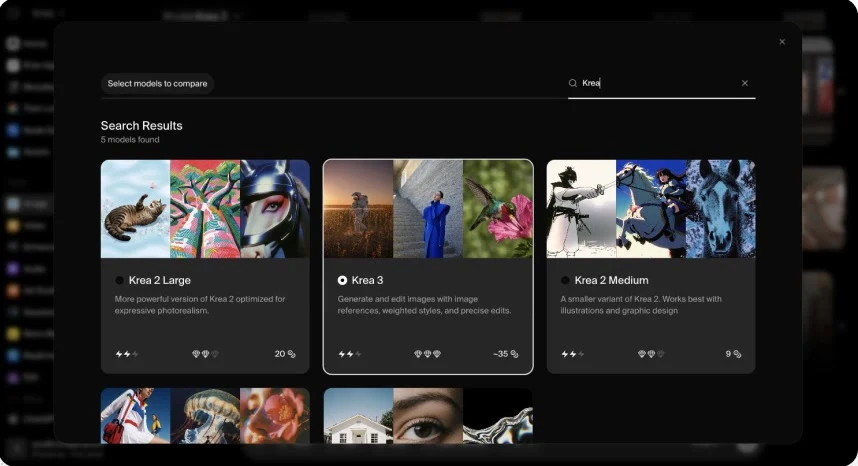
Rule of thumb: when something has to stay exactly right, use Krea 3. While you are still finding the look, use Krea 2.
Your files
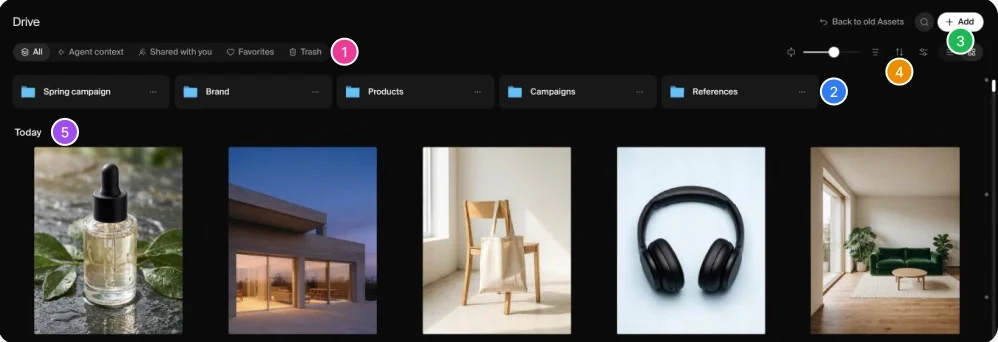
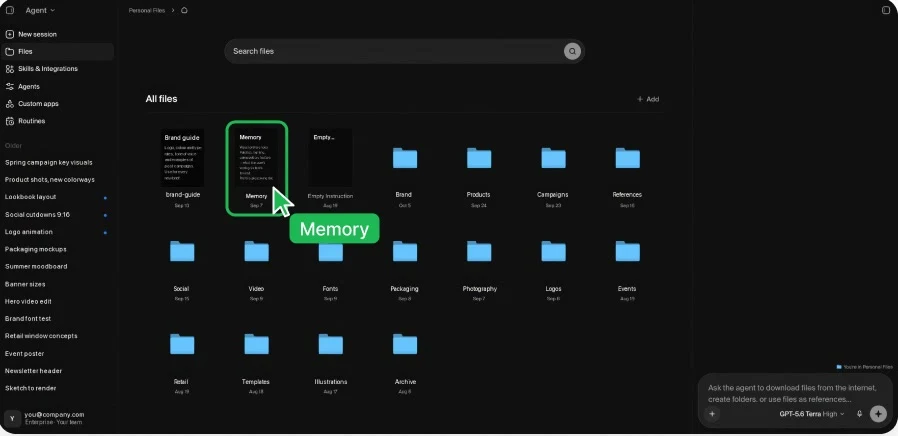
Krea Drive Everything you make, in one place.
-
Views
All, Agent context, Shared with you, Favorites, Trash.
-
Folders
One for each campaign, client or product.
-
Add
Upload files or make a new folder.
-
Size, filter & sort
Find files by type, tool or date.
-
Your files
Everything you make lands here, newest first.
Next steps
Where to start. Your first hour in Krea.
Step 1
Image
Generate four options for a real brief with Krea 3.
Step 2
Edit
Take the best one and put your product in it.
Step 3
Video
Turn that frame into a 6-second clip.
Step 4
Nodes
Tell the Nodes Agent to build this flow for you.
Step 5
Krea Drive
Put the results in a shared folder.
Next guide
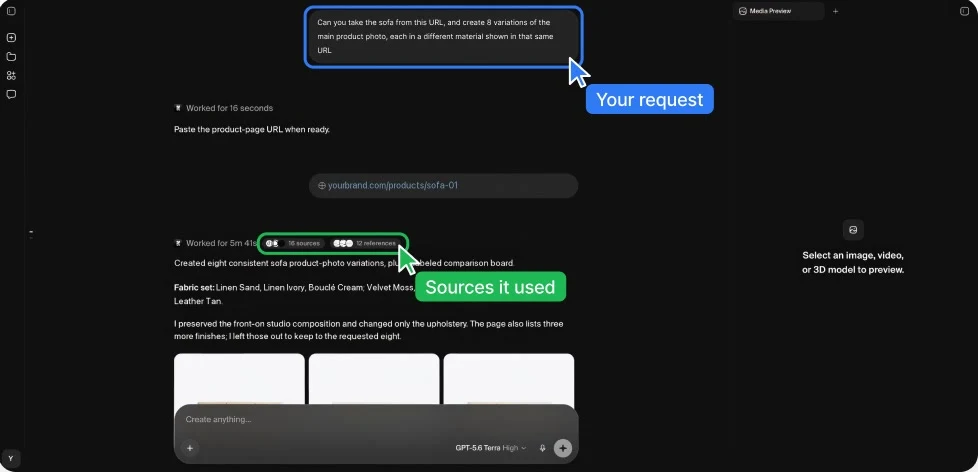
Intro to Krea Agent
How to brief the agent, give it your brand's context, connect your tools and keep usage in check.
Questions along the way?
Your Krea account team can walk your team through any of this.